Web Customisation
Using the windows system of Timemaster there are several functions to customise the Timemaster web, such as:
1. |
Login Message |
The login message is a plain text entry to be displayed on the login page
|
2. |
Terms & Conditions |
The login message is a plain text entry to be displayed on the login page. |
3. |
Expenses Entry Terms & Conditions |
The expense entry rules should be a .HTM file (or set of files) located anywhere on the web server. Specify the URL to your HTM pages
|
4. |
User Help |
The user help should be a set of HTM pages containing your customised help.
|
5. |
Company Logo |
|
Once any new settings have been set, they must beForce_Connection applied.
From the Control Parameters all except the company logo are setup:
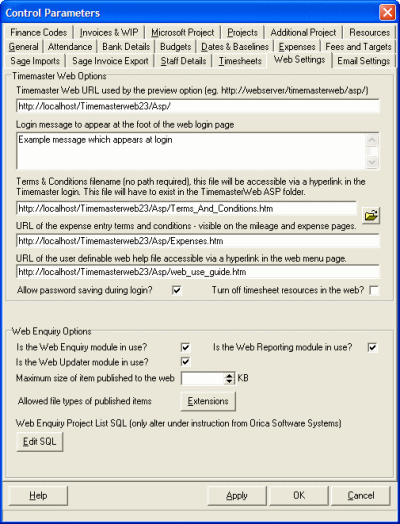
The login message is a plain text entry to be displayed on the login page.
The terms and conditions should be a .TXT file located in the /Asp folder under TimemasterWeb.
The expense entry rules should be a .HTM file (or set of files) located anywhere on the web server. Specify the URL to your HTM pages.
should be a set of HTM pages containing your customised help.
Company Logo
To include your company logo on the menu pages carry out the following steps.
1. Resize your logo to fit the space available (Max size is about 250 x 90 pixels) and save as a GIF file
| 2. | Copy the image into the /Images sub-folder under the TimemasterWeb folder |
| 3. | Rename your image file to companylogo.gif |
Once all options and functions have been entered and applied, these settings will be effective immediately.