Task Resources
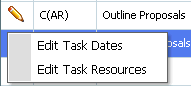
Select Projects from the LH menu, followed by the Tasks button and then click the Edit icon for the task you wish to resource plan.
Note: This is only available if you have the Resourcing module registered
Purpose
The Task Resources option allows you to resource plan at the task level.
Selecting to enter resources on a task will open the Task Resources page shown below.
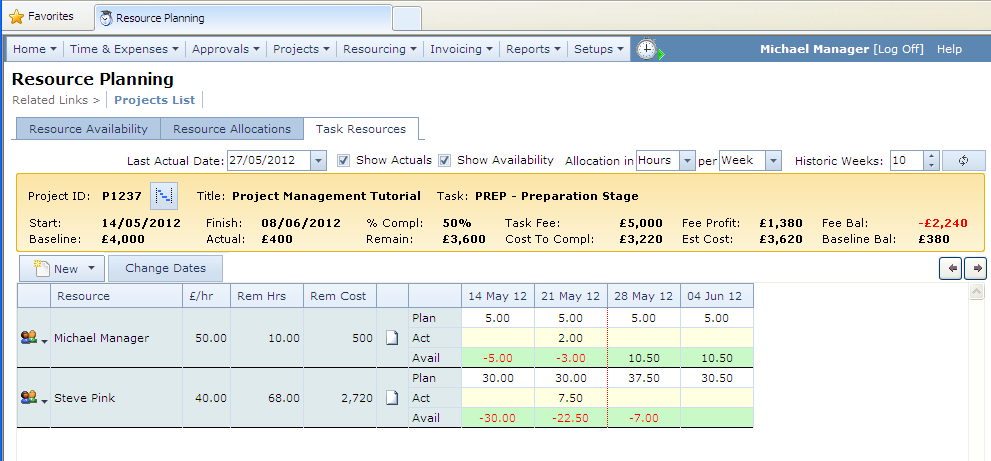
Viewing staff and task costs are controlled by access rights. If you do not have the appropriate access right(s) then your display may differ from the one shown above. The page shows for the selected task, the current target, cost from timesheets and cost of future resources, followed by a scrolling area containing the assigned resources and their allocations in hours or days per day/week or month.
The span of the allocations is fixed to the task start and finish dates - resources may not be allocated outside these dates.
Where the resource assignment is a role, then only the allocations to the current task are shown.
Where the resource assignment is a named person, then the allocations to the current task, actual hours from timesheets (prior to the Last Actual Date), and the staff availability is shown.
Before explaining the operation of this page, all the items shown on the page will be described. Alternatively, skip straight to the Operation section below.
Data Entry/Reference Guide
This section describes each data item on the page.
Last Actual Date |
The date from which resource allocations may be entered. Cells prior to this date will contain actual hours from timesheets. |
||||
Show Actuals Show Availability |
These two check boxes will show or hide the additional rows for actual timesheet hours and staff availability. Users with smaller screen resolutions may need to un-check these two items. |
||||
Allocations in Hours/Days per Week/Month |
Defines the units of display and the scale. These are set initially when first using the resourcing functions and are remembered between the resourcing pages. On this page they may be changed to allow a more detailed examination of the resource allocations. |
||||
|
Loads the Task Dates page with the current task. This is required if the task start/finish dates are to be changed. |
||||
Start |
The task target start date |
||||
Finish |
The task target finish date |
||||
% Complete |
The task percentage complete. This may be re-calculated when allocating resources depending on a Control Parameter. |
||||
Task Fee |
The fixed fee or time-charge estimate (if any) allocated to the task |
||||
Fee Profit |
The fixed fee less Estimate Cost |
||||
Fee Bal |
The fixed fee less the estimated cost at the charge rate. The remaining fee balance is calculated using charge rates instead of the cost rates |
||||
Baseline |
The original estimated cost of the task at the point of loading the page (ie the task target from the database at the time the page was loaded). The purpose of this is to show the user the difference between the estimated cost for the task when the page was initially loaded and the latest estimated cost. This will highlight to you the cost of the changes made to the resource plan in this session.
|
||||
Actual |
Cost of actual time booked through timesheets (regardless of timesheet status) up to the Last Actual Date.
|
||||
Remaining |
Arithmetic calculation of Baseline - Actual |
||||
Cost to Complete |
The cost of planned resources from the Last Actual Date to the end of the task. This is calculated dynamically after each resource allocation has been saved. |
||||
Estimated Cost |
Actual cost + Cost to Complete |
||||
Baseline Bal |
Baseline Target - Estimated Cost |
||||
|
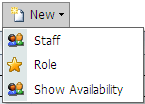
The New button provides a drop down menu with options to: • Add a new Staff assignment or
|
A grid shows a scrolling table containing the resource allocations for the selected task. The grid scrolls between the task start and finish dates, and is initially positioned at the Last Actual Date location.
Scrolling Grid
|
The Edit buttons against each assignment provide menu options to: • Delete an assignment
|
||
Change Dates |
The Change Dates button allows you to change the start or finish dates of the task without having to return back to the task planning page. This is useful if you need to plan resources outside the start or finish dates, as you can change dates and then plan the resources without having to leave the page. If you don’t have the access right to change dates, then the button will not be shown.
|
||
Resource |
This column shows the name of the resource assigned.
|
||
£/hr |
The resource cost rate allocated to the resource. This column may be turned off in some systems by a configuration setting. |
||
Rem Hrs |
The remaining hours is the total number of hours allocated to the resource from the Last Actual date up to the end of the task |
||
Rem Cost |
The remaining cost is the cost of the total hours resourced from the Last Actual Date to the end of the task. This column may be turned off in some systems by a configuration setting. |
||
|
The notes column indicates whether there are any notes attached to the assignment. An empty page icon indicates no notes exist, a populated page icon indicates notes exist. Click the icon to enter notes for the assignment. Notes are useful when assigning roles to attach a description of any special skills required by the assignment. |
||
Plan |
The Plan line contains the planned allocations. |
||
Act |
The Act line contains the actual hours worked on the task by the staff resource from the timesheets. These only show up to the Last Actual Date. |
||
Avail |
The Avail line changes depending on whether the cell is before or after the Last Actual Date. Before (ie. For historic weeks) the Avail line shows the difference between the planned and actual. After the Last Actual Date, the Avail line shows the overall availability for the staff resource. |
Operation
This section of the help describes how to add, remove and change resource assignments, and how to make resource allocations by date.
Adding and Removing Resource Assignments
To add a new resource:
• Click the New ( ![]() ) button at the top of the grid.
) button at the top of the grid.
| • | Select to add a new staff or role resource (you may be restricted to the type of resource you can add - staff based or role based - in which case you will only see the menu option applicable). |
| • | The resource is then added to the grid for you to enter allocations to. |
| • | A staff resource may only be assigned once, whereas role based resources may be assigned multiple times. |
To remove a resource:
• Click on the menu icon next to the resource you wish to remove; Role: ( ![]() ), or Staff (
), or Staff ( ![]() )
)
| • | Click on the Delete Resource option. |
| • | The delete option only deletes resource allocations ahead of the Last Actual Date. If the resource has allocations in the past then it is not possible to completely remove the resource assignment. |
Changing Task Dates
Task dates cannot be changed within this view. You need to change pages to the Tasks page and change the dates there. After saving your changes, select the Edit Task Resources again to refresh the resources page to take into account the new dates.
Entering Notes
You may enter notes against each assignment by clicking on the Notes icon (![]() ) next to the assignment.
) next to the assignment.
Adding Allocations
Allocations are edited by clicking in a particular cell within the grid on and after which you want to edit the allocations. For example, if you wanted to enter allocations for the last 4 weeks of a task then scroll 4 weeks from the end of the task before clicking on the cell.

Clicking on a cell opens an Allocate Window. This option allows you to enter allocations or change some or all of the assignment to another person or role.
The Allocate window allows you to enter allocations by specifying the number of hours you want to enter into each cell, and the number of cells. For example, enter 20 hours per week for 3 weeks.
Therefore if you needed to resource plan someone at 20 hours per week for 3 weeks and then 5 hours per week for 2 weeks, followed by 20 hours per week for 1 week you would enter three lots of resources:
1. 20 hours for 3 weeks starting at week 1
| 2. | 5 hours for 2 weeks starting at week 4 |
| 3. | 20 hours for 1 week starting at week 6 |
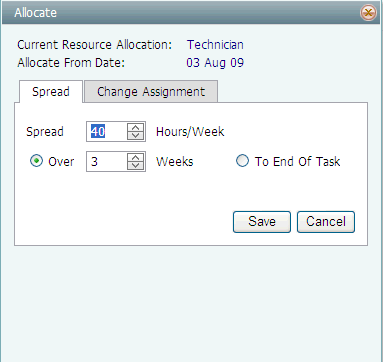
• If the active page is not Spread (but is Change Assignment), then click the Spread page
| • | Enter the number of hours to enter in the Hours per Week field |
| • | Select a specific number of weeks and enter the number of weeks, or |
| • | Select the "to end of task" option |
| • | Normally the allocations saved will be the requested number of hours per week unless the employee is already committed during that time, in which case only the available time will be allocated. Thus spreading 15 hours per week actually means spread up to 15 hours per week if available. |
| • | If there was not enough available time to allocate all that was requested, a warning message is show to alert you. The next two checkboxes determine what happens if there is not enough available time. |
| • | If allocating named resources, two additional check boxes are shown to allow you to override other commitments on other projects. These are explained in the next couple of bullet points. |
| • | Click the Override Projects checkbox if you want your allocations to be forced through even if the resource is assigned to other projects and doesn’t have enough time available. Note that this will over-commit the person. |
| • | Click the Override Absence checkbox if you want your allocations to be forced through over pre-booked absences. This will result in the employee being allocated to your project when they are due to be absent. |
| • | If allocating role based resources, the override check boxes are not relevant and are therefore not shown. |
Slipping or Advancing Resources
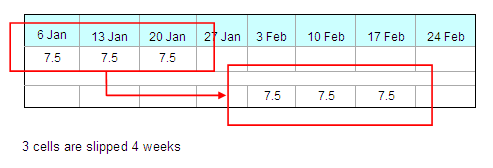
Resource allocations may be easily slipped or advanced by a set number of weeks (or days or months) to account for slippages. To move an allocation, click on the allocation you wish to move and select the middle page – Slip Assignment from the 3-page editing pop-up window.
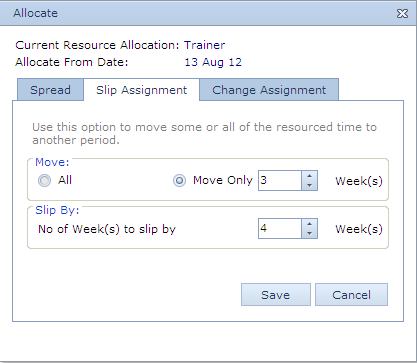
• Move:
| o | Select the number of cells to move, |
| o | Select All to move all cells after the initial starting point |
Slip By:
| o | Enter the number of weeks to slip |
| o | Enter a negative number to advance the allocations (eg -3 will bring forward the allocations by 3 cells) |
Allocations are only moved if there is enough availability. Any allocations which cannot be moved are left in their original position – they are not deleted.
Allocations cannot be moved past the end of task boundaries (ie start and finish points).
If moving allocations to a cell which already contains some allocations, the moved allocations are added to the cell contents rather than replacing the cell contents.
Assigning to a different resource
Changing an assignment to another person or role is carried out by moving allocations between assignments, rather than changing the assignment itself. Once the allocations have been moved the old assignment may then be deleted if required. This function is multi-purpose in that it allows you to totally change allocations or partially change allocations from a specific date or only move some of the allocations (i.e. just move 20 hours).
For example, if you wanted to change allocations only for the last 4 weeks of a task then scroll 4 weeks from the end of the task before clicking on the cell.
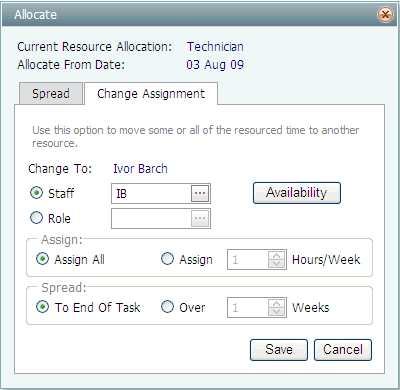
• The cell click is shared with the Allocations window. If the active page is not Change Allocations (but is Spread), then click the Change Allocations page.
| • | Select whether to change the allocations to a named staff or a role. If changing from a role to a named staff, then only staff who match the role will be listed. The role matching may be toggled off using a checkbox on the staff lookup list. |
| • | Select whether to assign all hours per week or assign only part of the allocation. |
| o | Assign All will transfer the full compliment of hours |
| o | Assign x hours/week will only transfer some of the allocation |
| • | Select whether to assign all weeks or only part of the weeks |
| o | Assign x weeks will assign only the request number of weeks |
| o | Assign to end of task will assign all weeks |
| • | The Change Allocation function will only change allocations which do not over-commit the new resource. In other words, if the receiving staff member does not have enough available time then only the allocations up to the available time will be changed over. Any over-commitment must be manually forced through. |
| • | The Availability button allows you to view staff availability by passing the task parameters through to the Resource Availability page. The parameters passed are: |
| o | Service |
| o | Out-going role (if any) |
| o | Last Actual Date |
| o | Task Finish Date |
This populates the Resource Availability page with the related parameters to assist in searching for staff who have available time of the appropriate service and role within the task duration. Once found, the person must be manually inserted - there is no "paste" facility back from the Resource Availability page.
Viewing Staff Availability
To view staff availability, either:
• Click the View Resource Availability option under the New ( ![]() ) button. This will open the Resource Availability tabbed page and feed through the service and task dates as filter criteria, or
) button. This will open the Resource Availability tabbed page and feed through the service and task dates as filter criteria, or
| • | Click the Resource Availability tabbed page at the top to open the Resource Availability page without passing through any task related filtering. |
The Resource Availability is explained in its own topic.
Related Topics